A Beginner’s Guide to Capturing Waterfalls in Landscape Photography
Table of Contents:
- Introduction
A. Why Waterfall Photography Is Unique
B. The Allure of Waterfalls in Photography - Preparing for Waterfall Photography
A. Gear Essentials
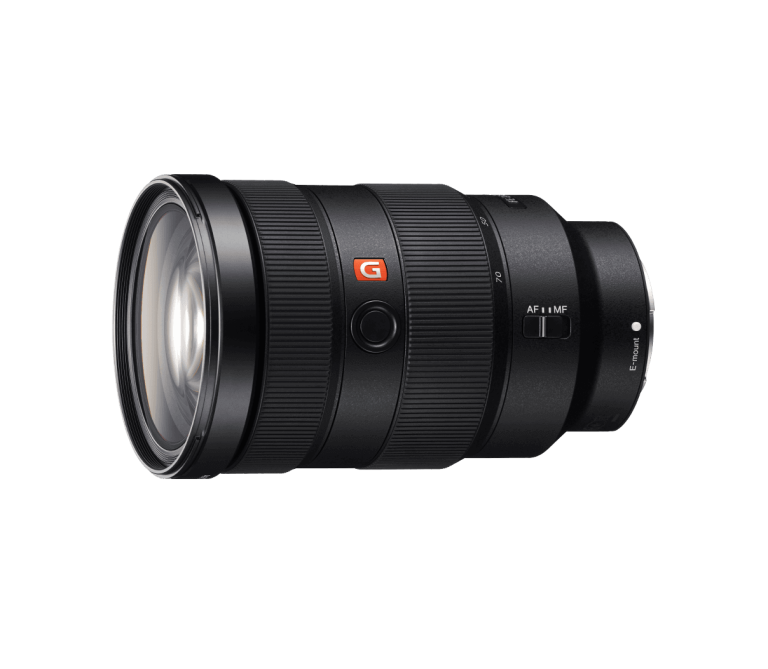
1. Camera and Lens Selection
2. Tripod and Accessories
B. Understanding Light Conditions
1. The Importance of Soft Light
2. Using Circular Polarizer Filters
III. Camera Settings for Waterfall Photography
A. Image Aesthetics
B. Aperture and ISO
C. Leveraging Neutral Density Filters
D. Enhancing Images with Polarizing Filters
- Composition Techniques
A. Capturing Unique Perspectives
B. Incorporating Human Elements
C. The Role of Foreground in Composition
D. Avoiding Direct Sunlight - Shutter Speed and Bracketing
A. Experimenting with Shutter Speeds
B. The Benefits of Bracketing - Post-Processing for Waterfall Photos
A. Enhancing Details, Textures, and Colors
B. The Role of Editing Software
VII. Tips for Fabulous Waterfall Photography
A. Staying Informed with Weather Forecasts
B. Understanding the Waterfall Location
C. Proper Equipment and Accessories
D. The Impact of Sky in Your Composition
E. Finding Compelling Foreground Elements
F. Protection and Maintenance of Camera Gear
G. The Seasonal Variation in Waterfall Photography
VIII. Capturing Waterfalls Safely
A. Safety Precautions
B. Keeping Your Equipment Dry
- Incorporating Unusual Angles and Framing
A. Exploring Unique Perspectives
B. Framing Techniques - Conclusion
A. The Endless Beauty of Waterfalls
B. Encouragement to Explore and Experiment
I: The Allure of Waterfalls in Photography
Waterfalls hold a unique and irresistible charm that beckons photographers from all walks of life. It’s an allure that transcends the confines of our daily existence, transporting us to a world where time seems to stand still. In this section, we will explore the captivating beauty and mesmerizing qualities of waterfalls that make them a favorite subject for landscape photographers.
As I stand before a cascading sheet of water, my senses are immediately overwhelmed by the symphony of nature. The sheer power and force of the waterfall, as it crashes against the rocks and plummets into the pool below, create a thunderous roar that resonates in my very core. It’s a primal, almost hypnotic sound that reminds me of the Earth’s incredible might.
The visual spectacle is equally enthralling. The water, glistening in the soft light of dawn or bathed in the golden hues of sunset, dances with grace and fluidity. Each drop seems to possess a life of its own, sparkling as it catches the sunlight. The sheer volume of water in motion creates a dynamic, ever-changing scene that keeps my camera’s shutter clicking endlessly.
As a landscape photographer, I find myself drawn to waterfalls for the drama they bring to my compositions. They serve as both focal points and natural frames, adding depth and context to my images. The juxtaposition of the serene pools at the base of the falls against the turbulent rush of water above creates a sense of tension and balance that is visually arresting.
Moreover, the lush surroundings of waterfalls contribute to their irresistible appeal. The vibrant greens of moss-covered rocks, the delicate ferns clinging to crevices, and the ancient trees that stand sentinel nearby all enrich the visual narrative of the scene. It’s a testament to the intricate relationship between waterfalls and their natural environment.
In my years of exploring and photographing waterfalls, I’ve come to appreciate how they represent the very essence of nature’s artistry. They are the result of eons of geological processes, shaped by the relentless flow of water and the patient hand of time. Each waterfall tells a story of resilience and transformation, making them not just subjects of my photography but also sources of inspiration.
Waterfalls are not mere geographical features; they are living, breathing entities that pulse with energy and vitality. They evoke a deep sense of wonder and reverence for the natural world. Whether I’m standing before a towering cascade or a gentle cascade hidden in the heart of a forest, I am reminded of the Earth’s grandeur and the importance of preserving its beauty for future generations.
The purpose of this article, I will share with you the tips and techniques I’ve honed over the years to capture the essence of waterfalls through the lens of my camera. We will delve into the technical aspects, the equipment needed, and the creative choices that can elevate your waterfall photography to new heights. But before we embark on this photographic journey, let us continue to bask in the enchantment of these natural wonders.
II: Preparing for Waterfall Photography
In the world of photography, success often hinges on meticulous preparation. The pursuit of that perfect shot requires not just an artistic eye but also a well-equipped arsenal and a profound understanding of the elements. In this section, I will guide you through the crucial steps of preparing for a successful waterfall photography expedition.
Gear Essentials
Before venturing into the realm of waterfall photography, it’s imperative to ensure that you have the right gear at your disposal. While the artistic aspect of photography is paramount, the equipment you choose can make a significant difference in the quality of your final images.
Camera and Lens Selection
First and foremost, your camera and lens selection will play a crucial role. When it comes to capturing amazing photos, it’s advisable to use a mirrorless camera that allows you to have manual control over settings like aperture, shutter speed, and ISO. These settings are vital for achieving the desired effects in waterfall photography.
As for lenses, a wide angle lens is often the go-to choice for photographing waterfalls. It provides a broader field of view, allowing you to capture not only the waterfall but also its surrounding environment in a single frame. This helps convey the grandeur and scale of the scene. A lens with a focal length between 16mm and 35mm is a good starting point.
Tripod and Accessories
Stability is paramount in waterfall photography, as long exposure shots require a steady camera. That’s where a reliable tripod comes into play. Invest in a sturdy, lightweight tripod that can handle the rigors of outdoor shooting. Look for one with adjustable legs and a ball head for versatile positioning.
Additionally, accessories like a remote shutter release or intervalometer can be indispensable. They allow you to trigger your camera without physically touching it, minimizing the risk of camera shake during long exposures. Even if you don’t have one, you can use your camera’s timer function to achieve a similar effect.
Understanding Light Conditions
Light is the photographer’s paintbrush, and in waterfall photography, it takes on a unique significance. Pay attention to the highlights of the surroundings. Look at the light shining in and around the waterfall. Watch for the highlights in the water as it could add a sense of something extra in your photo. The interplay between light and water is what gives waterfall images their magical quality. To capture this magic, you must understand and harness different lighting conditions effectively.
Soft Light is Ideal for Waterfall Landscape Photography
Soft, diffused light is often the Holy Grail for waterfall photographers. This type of light is gentle, even, and devoid of harsh shadows. It can be found during overcast days or in the soft glow of early morning and late afternoon—the golden hours. Soft light bathes the scene in a flattering, ethereal glow, enhancing the textures and colors of both the waterfall and its surroundings.
To make the most of soft light, plan your waterfall photography expeditions during these ideal lighting conditions. Early mornings, just after sunrise, or late afternoons, right before sunset, are your windows of opportunity. These moments not only provide soft ambient light but also add a touch of warmth to your images, infusing them with a captivating mood.
Using Circular Polarizer Filters
While natural lighting conditions are excellent, you can further enhance your waterfall images with the strategic use of filters. Among the most valuable tools in a waterfall photographer’s kit is the circular polarizer filter.
Circular polarizers work wonders in two key aspects of waterfall photography: reducing glare and enhancing color saturation. By reducing glare, they allow you to see beneath the water’s surface and capture the details of submerged rocks and features. This is particularly beneficial when you want to reveal the mesmerizing textures beneath the water’s surface. Additionally, circular polarizers intensify colors, making the greens of moss-covered rocks and the blues of the sky and water pop in your images.
To use a circular polarizer effectively, attach it to your lens and rotate it until you achieve the desired effect. Be mindful of its impact on exposure, as it may reduce the amount of light entering your lens. Adjust your camera settings accordingly to maintain the correct exposure.
Section 3: Camera Settings for Waterfall Photography
In the realm of waterfall fine art photography, mastering your camera settings is akin to wielding a painter’s brush with finesse. The choices you make regarding image aesthetics, aperture, ISO, and the judicious use of filters will determine the mood and impact of your images. In this section, we will delve deep into the technical intricacies that will elevate your photos of waterfalls to a whole new level.
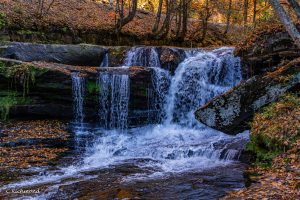
Image Aesthetics
Every photograph tells a story, and the aesthetics of your image serve as the narrative’s voice. When it comes to waterfall photography, the aesthetics you choose can profoundly influence the emotional impact of your shots.
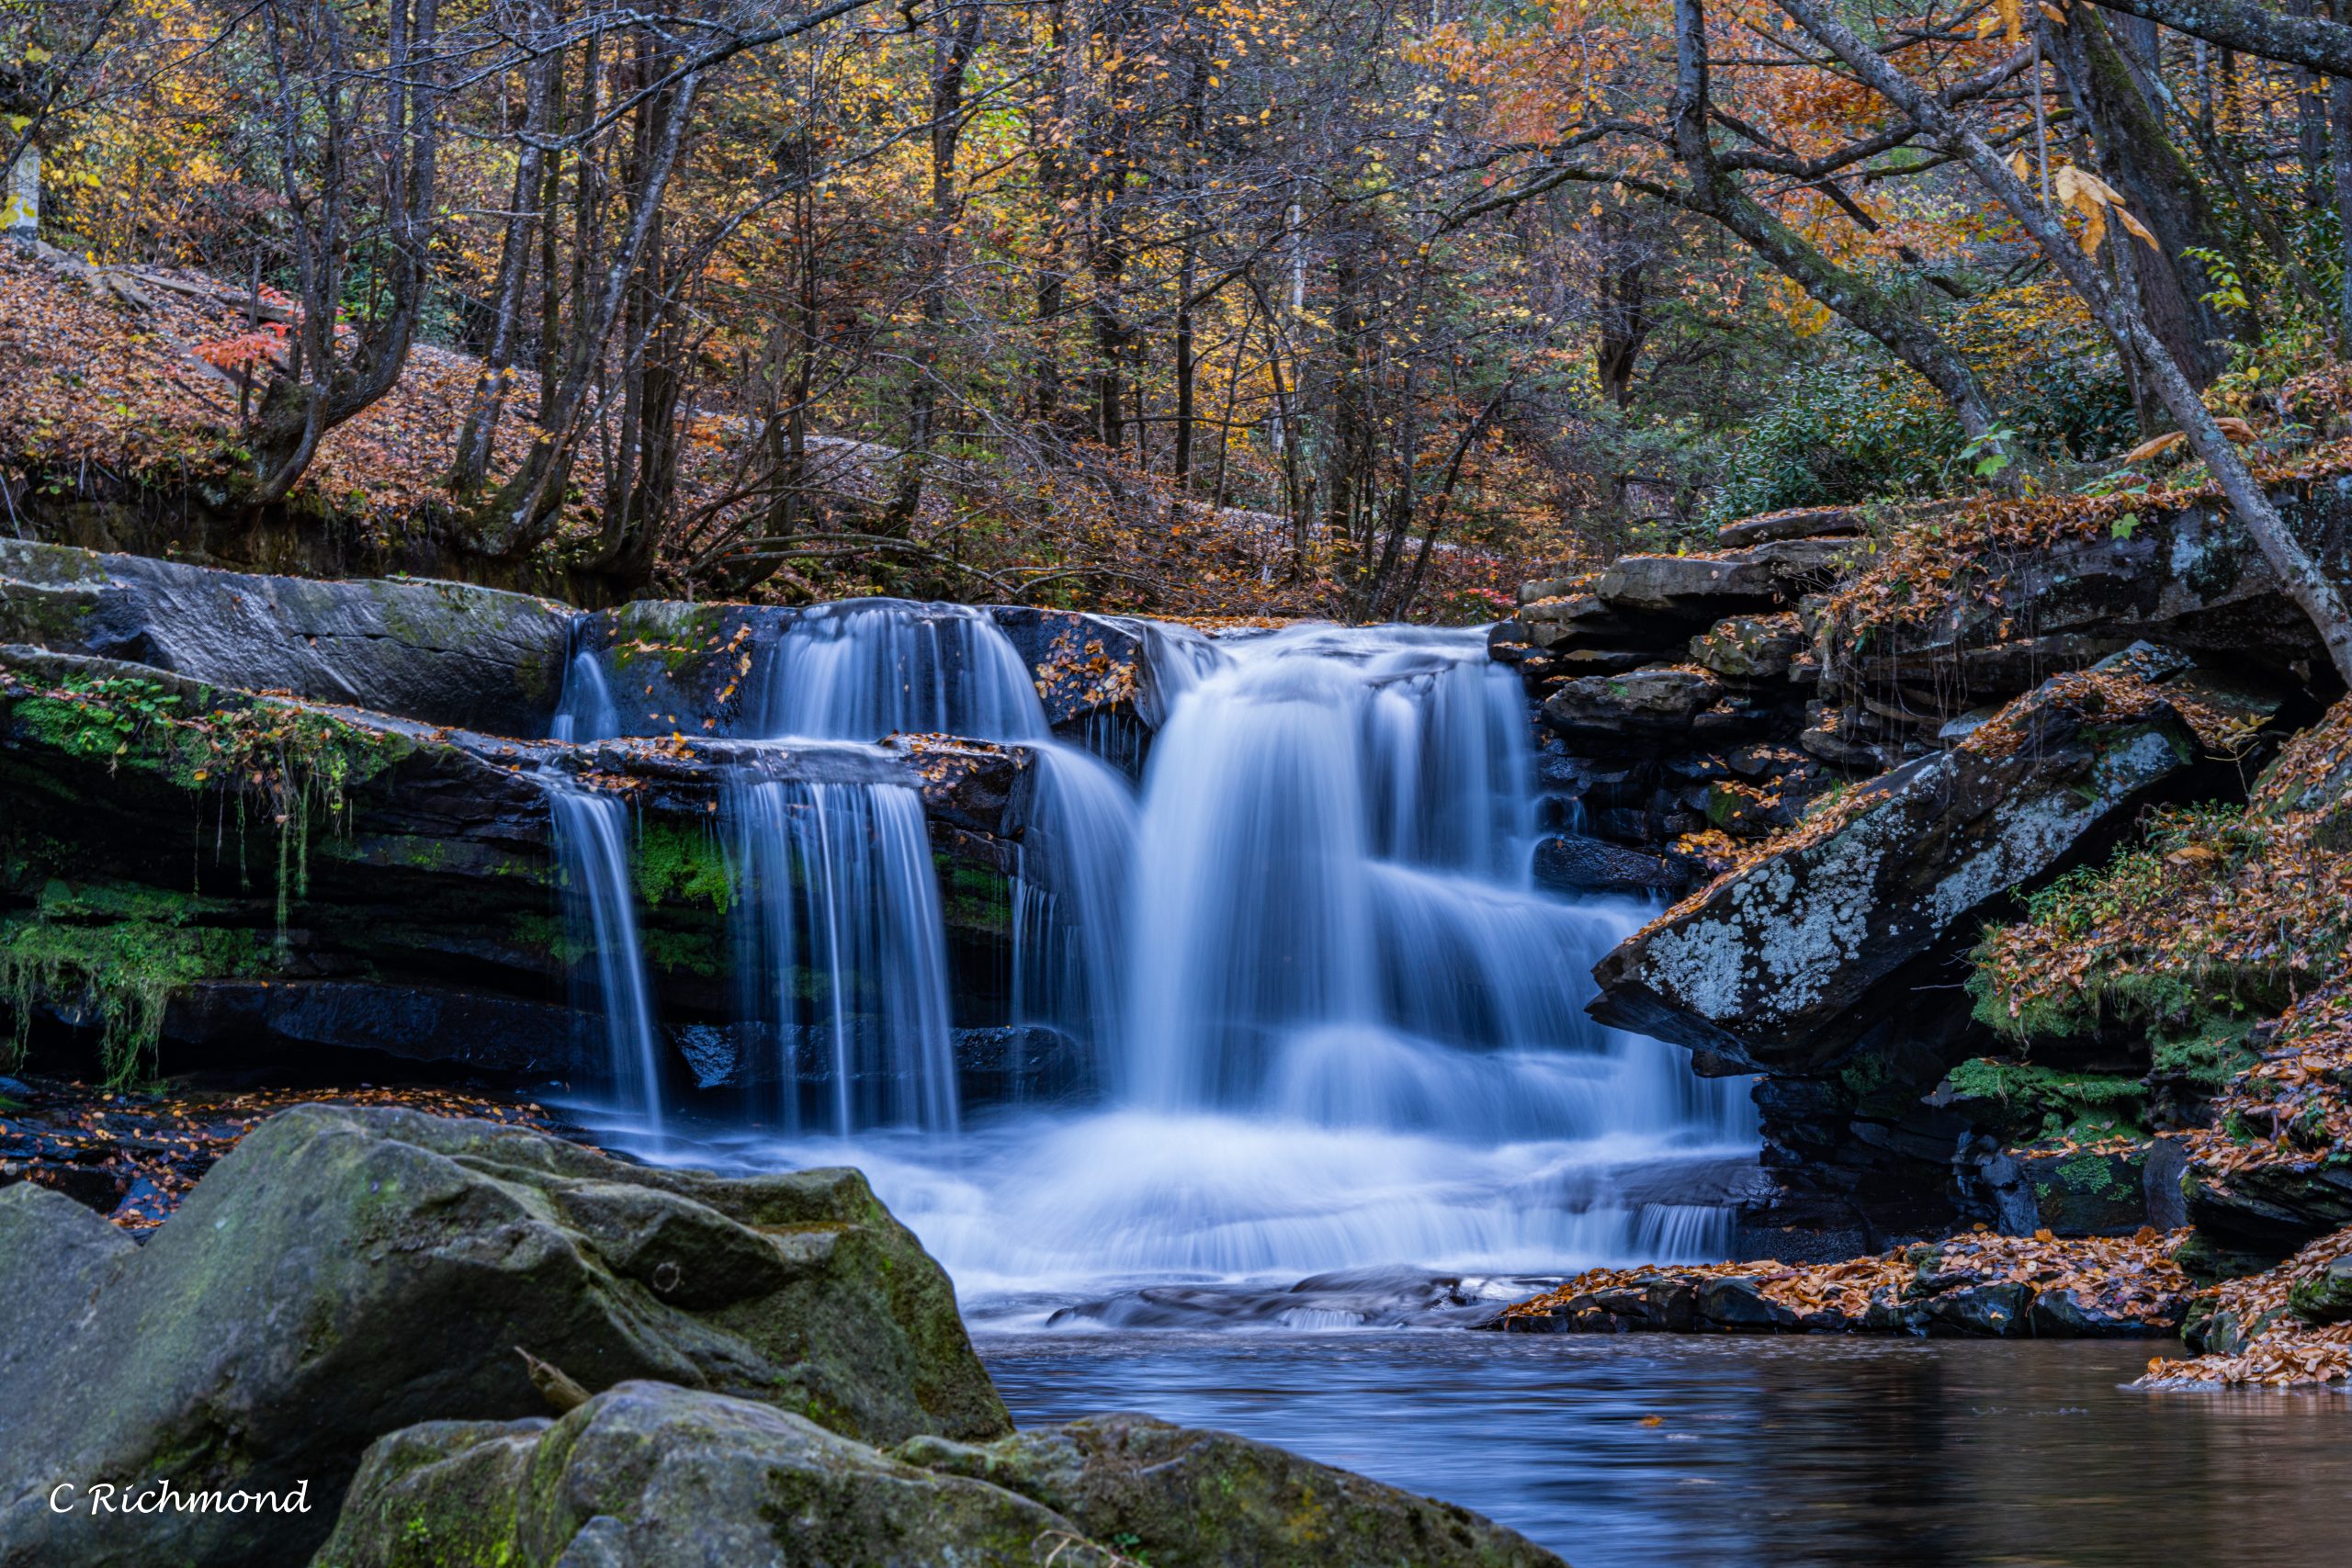
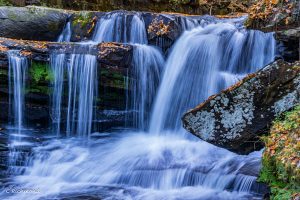
One fundamental choice is between capturing the waterfall as a frozen moment in time or rendering it as a silky, ethereal flow. To achieve the latter effect, you’ll need to experiment with long exposure photography. By using a slow shutter speed, typically ranging from a few seconds to several minutes, you can transform the turbulent cascade into a graceful veil of moving water. This technique not only adds a dreamy quality to your images but also emphasizes the sense of motion and the passage of time. Slow down the shutter speed to create the image that you see of the famous waterfalls. A fast shutter speed is perfect for fast moving objects, but it is not what is used to photograph falling water.
Aperture and ISO
Your choice of aperture plays a pivotal role in shooting waterfall photography, affecting both exposure and image aesthetics. A narrow aperture (high f-stop, like f/16 or f/22) results in a deeper depth of field, ensuring that both the foreground and background remain in sharp focus. This is ideal for capturing intricate details of rocks and foliage surrounding the waterfall.
However, a narrow aperture also reduces the amount of light hitting your camera’s sensor. To compensate for this, you may need to use a slower shutter speed or a higher ISO setting. Be cautious with ISO, though, as higher values can introduce noise into your images. Striking the right balance between aperture, shutter speed, and ISO is essential for achieving a well-exposed image with the desired aesthetics.
Neutral Density Filters
In the pursuit of long exposure waterfall photography, neutral density (ND) filters are indispensable. These filters are like sunglasses for your camera, reducing the amount of light entering the lens without affecting color balance. By using ND filters, you can extend your exposure times even in bright daylight.
ND filters come in different strengths, typically measured in stops (e.g., ND2, ND4, ND8). The higher the number, the denser the filter, and the longer your exposure can be. For waterfall photography, a 6-stop or 10-stop ND filter is often a good starting point. These filters allow you to achieve exposure times of several seconds or more, blurring the motion of the waterfall and creating that signature silky effect.
Polarizing Filters
Circular polarizing filters, mentioned earlier, have a dual role in waterfall photography. In addition to reducing glare and enhancing color saturation, they can also affect exposure. When you rotate a polarizing filter, you can adjust the amount of light it allows to pass through the lens.
Polarizing filters can be particularly handy when you’re dealing with bright scenes where a slow shutter speed is desired for the waterfall’s silky effect. By reducing the incoming light with the filter, you can maintain the desired exposure settings without overexposing your image. It’s a delicate balancing act that requires practice and experimentation.
Section 4: Composition Techniques for Capturing Waterfalls
The allure of a waterfall is not solely derived from its natural splendor; it’s also a testament to the photographer’s artistry in framing and composition. In this section, we will delve into the creative aspects of waterfall photography, exploring techniques that will help you capture not just the physicality but also the emotions evoked by these cascading wonders.
Capturing Unique Perspectives
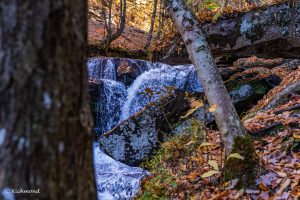
Waterfalls, like any other subject in photography, offer an abundance of angles and perspectives waiting to be explored. While the classic full-frontal view of a waterfall is undoubtedly striking, it’s also one that has been captured countless times. To truly stand out, you need to think outside the box and seek out unique vantage points.
One approach is to scout the area surrounding the waterfall for elevated viewpoints, such as cliffs or overlooks. These perspectives can provide a fresh angle, allowing you to capture the waterfall from above or at an oblique angle. This not only adds visual interest but also offers a sense of scale as you include the surrounding landscape.
Another technique is to get up close and personal with the waterfall. Use a wide-angle lens and a sturdy tripod to position your camera at the edge of the pool or at the base of the falls. This proximity allows you to emphasize the sheer power and scale of the waterfall, creating images that immerse the viewer in the scene. In the fall incorporate fallen leaves in your photograph.
Incorporating Human Elements
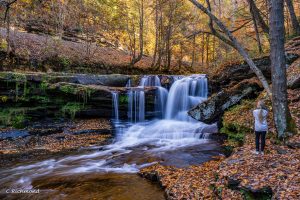
While waterfalls are undoubtedly magnificent in their own right, adding a human element to your compositions can inject a sense of scale and emotion. The inclusion of a person in your frame can help viewers relate to the scene on a personal level, as it provides a reference point for understanding the waterfall’s size and grandeur.
Consider having a friend or fellow photographer stand near the waterfall, whether it’s in the foreground, mid-ground, or background. Their presence not only adds a storytelling element to your image but also provides a visual anchor that can guide the viewer’s eye through the photograph.
Another approach is to use the silhouette of a person or a group of people against the backdrop of the waterfall. This technique can create a sense of wonder and exploration, inviting viewers to imagine themselves in the scene. The contrast between the dark silhouettes and the illuminated waterfall can be particularly dramatic during the golden hours of sunrise or sunset.
Using Photography Composition
Composition is the language through which photographers communicate with their viewers. It dictates how elements are arranged within the frame and can profoundly impact the visual narrative of an image. When it comes to waterfall photography, certain compositional techniques can help you create captivating and emotionally resonant photographs.
One fundamental concept is the rule of thirds. Imagine dividing your frame into a grid of nine equal parts, like a tic-tac-toe board. Placing the main elements of your photograph along these grid lines or at their intersections can create a visually balanced and pleasing composition. For example, you might position the waterfall along one of the vertical grid lines while placing a striking foreground element along the lower horizontal line.
Leading lines are another powerful compositional tool. Use natural elements like rocks, streams, or even trails to guide the viewer’s eye toward the waterfall. Leading lines draw attention to the focal point of your composition, enhancing the sense of depth and perspective.
Additionally, consider the use of framing elements. Utilize natural surroundings, such as overhanging branches, rock formations, or other vegetation, to frame your waterfall. This technique not only adds visual interest but also provides context and depth to your images.
Section 5: Post-Processing for Stunning Waterfall Photos
After capturing the raw beauty of waterfalls through your camera lens, the journey continues in the digital darkroom. Post-processing is where your creative vision takes flight, where you refine and enhance your waterfall images to bring out their full potential. In this section, we will explore the art of post-processing and how it can elevate your waterfall photography to new heights.
Enhancing Details, Textures, and Colors
In the world of waterfall photography, post-processing is not about altering reality; it’s about revealing the true essence of the scene as your eyes perceived it. To achieve this, we’ll delve into techniques that enhance the details, textures, and colors of your waterfall images.
Begin by importing your RAW files into your preferred editing software, such as Adobe Lightroom or Photoshop. RAW files contain a wealth of information that allows for extensive adjustments without compromising image quality.
One of the first steps in post-processing is adjusting exposure and contrast. Use the exposure slider to fine-tune the overall brightness of your image, ensuring that the waterfall and its surroundings are properly exposed. Be cautious not to overexpose highlights or lose details in the shadows. Use the contrast slider to control the differentiation between light and dark areas, enhancing the waterfall’s definition.
Next, focus on clarity and sharpness. Applying a moderate amount of clarity can bring out intricate details in the waterfall, such as the flow of water and the texture of rocks. Use the sharpening tool to enhance the overall sharpness of the image, making sure not to overdo it to avoid introducing noise.
The colors in your waterfall photos are an integral part of their emotional impact. Use the vibrance and saturation sliders to intensify colors while maintaining a natural look. Pay particular attention to the greens of moss-covered rocks and the blues of the water and sky, as these colors often play a central role in waterfall compositions.
The Role of Editing Software
Selective editing is a valuable technique for emphasizing specific areas of your image. Use graduated filters or adjustment brushes to target areas that require additional attention. For instance, you can enhance the contrast and clarity of the waterfall itself while preserving the softness of surrounding foliage.
When working with waterfall images, don’t shy away from experimenting with different editing styles and presets. Each image is unique, and your creative choices during post-processing should reflect its individual character. Over time, you’ll develop a post-processing workflow that complements your personal style and vision.
Another aspect of post-processing to explore is color grading. Color grading allows you to establish a consistent mood and atmosphere in your images. For example, you can enhance the serene and calming nature of a waterfall scene by infusing it with cool blues and soft pastels. Conversely, you can evoke a sense of drama and intensity by emphasizing warm tones and rich contrasts.
As you embark on your post-processing journey, remember that subtlety often yields the most powerful results. The goal is not to overwhelm the viewer but to guide their eye to the key elements of the composition and evoke an emotional response. Post-processing is your tool for fine-tuning your images and making them resonate with the beauty and wonder of the waterfall scene you witnessed.
Section 6: Photography Tips for Beautiful Waterfall Photos
As you venture into the captivating world of waterfall photography, there are several key considerations and practices that can make your experiences not only artistically rewarding but also safe and environmentally conscious. In this final section, we will provide you with a comprehensive list of essential tips and guidelines to ensure that your waterfall photography excursions are both successful and responsible.
Watch the Weather Forecast
Nature’s mood can change dramatically with shifts in weather conditions. To maximize your chances of capturing breathtaking waterfall images, pay close attention to weather forecasts. Rainy or overcast days can create soft, even lighting that is ideal for waterfall photography. These conditions minimize harsh shadows and highlights, allowing you to capture more details and textures.
In addition to lighting, weather forecasts can also alert you to potential hazards, such as heavy rain or thunderstorms. Safety should always be a top priority, and avoiding adverse weather conditions is crucial to protect yourself and your equipment.
Know the Layout
Before embarking on a waterfall photography expedition, take the time to familiarize yourself with the location. Study maps, guides, and trail information to understand the layout of the area. Identify the trails, viewpoints, and access points that will allow you to reach your desired waterfall photography spots safely.
Knowing the layout also helps you plan your compositions. You can visualize potential angles and perspectives to capture beautiful waterfalls while incorporating natural elements and foreground interest.
Be Properly Equipped
Waterfall photography often involves venturing into natural settings, which can be rugged and challenging. Ensure that you are properly equipped for the journey. Here are some essential items to include in your gear:
- Sturdy hiking boots with good traction
- Weather-appropriate clothing and rain gear
- A reliable backpack to carry your equipment and essentials
- Adequate water and snacks for sustenance
- Navigation tools like maps and a compass or GPS device
- A first-aid kit for emergencies
- Insect repellent for protection against bugs
By being well-prepared, nature photographers can focus on capturing stunning images without being hindered by discomfort or unexpected challenges.
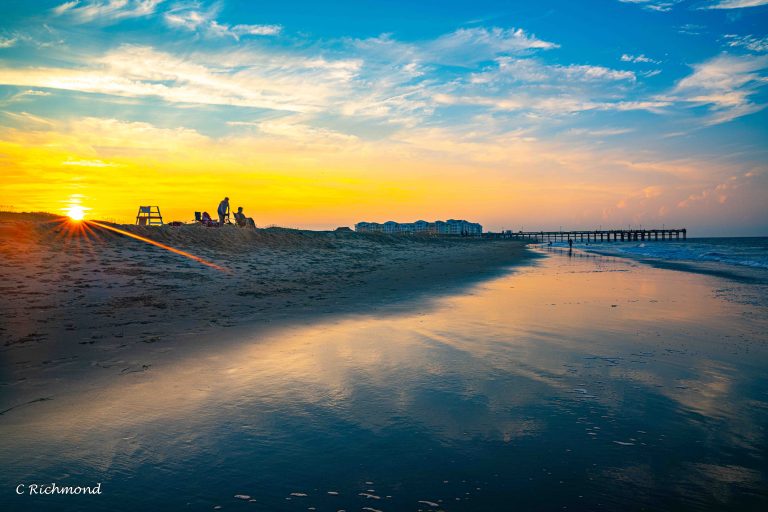
Determine if the Sky Should Be Part of Your Composition
When taking photos, consider whether you want to include the sky in your composition. The choice between including or excluding the sky can dramatically affect the mood of your image.
Including the sky can add context and scale to your photographs. It helps viewers understand the outdoor setting and the relationship between the waterfall and its surroundings. However, it’s essential to be mindful of exposure settings when including the sky. The dynamic range between the bright sky and the darker waterfall can be challenging to balance.
On the other hand, excluding the sky can create an intimate and focused view of the waterfall itself. It allows you to concentrate on the intricate details and textures of the waterfall without distractions. This approach works particularly well when you’re exploring close-up shots or abstract compositions.
Ultimately, the decision to include or exclude the sky should align with your creative vision for each specific photograph.
Look for Foreground Interest
One of the hallmarks of compelling waterfall photography is the inclusion of foreground interest. Adding interesting elements in the foreground of your composition can enhance depth, context, and visual appeal.
Search for rocks, foliage, flowers, or other natural features that can serve as foreground elements. Positioning these elements strategically can guide the viewer’s eye into the image and provide a sense of scale. The contrast between the detailed foreground and the majestic waterfall in the background adds visual interest and depth to your photographs.
Foreground interest also helps create a stronger connection between the viewer and the scene. It invites viewers to imagine themselves standing at the edge of the waterfall, immersed in the natural beauty.
As you explore various locations and compositions, keep an eye out for unique foreground elements that can elevate your waterfall images.
Experiment with Different Shutter Speeds
The choice of shutter speed is a pivotal creative decision in waterfall photography. It determines how motion is captured and expressed in your images. Experimenting with different shutter speeds allows you to craft photographs with varying emotional impact.
For that classic silky water effect, opt for longer shutter speeds ranging from several seconds to minutes. This technique blurs the motion of the waterfall, creating a sense of serenity and timelessness. It transforms the turbulent cascade into a graceful and ethereal flow.
On the other hand, faster shutter speeds (usually less than a second) can freeze the water’s motion, preserving intricate details and textures. This approach is excellent for emphasizing the power and dynamic energy of the waterfall.
Bracket Your Shots
Bracketing involves capturing multiple exposures of the same scene at different settings, typically varying the exposure value (EV). This technique is particularly useful in challenging lighting conditions or when you want to capture a wide range of tones, such as the brightness of the waterfall and the shadows in the surrounding rocks.
Bracketing allows you to merge these exposures during post-processing to create a final image with a broader dynamic range. This ensures that both the highlights and shadows are well-exposed, resulting in a photograph that faithfully represents the scene’s tonal range.
Don’t Be Afraid to Get Close
Waterfalls possess a magnetic draw that beckons us to get as close as possible. Embrace this urge, but do so with caution and respect for your safety and the environment.
Approach the waterfall carefully, watching your step and ensuring your footing is secure. Use sturdy footwear with good traction to navigate slippery rocks and wet terrain. Getting close to the waterfall allows you to capture the sheer power and energy of the cascading water, creating images that convey the immersive experience of standing in its presence. Photographing waterfalls can be challenging. The movement of the water can change your perspective of how deep the water even is.
However, be mindful of your equipment’s proximity to splashing water. Waterfall environments can be misty, and fine water droplets can settle on your camera lens. Use lens cloths or filters to protect your lens from moisture, and consider using a lens hood to shield it from spray.
Protect Your Camera and Gear
Waterfall environments can be harsh on your camera and photography gear. Protecting your equipment is essential to ensure it functions correctly and remains in good condition.
Consider using a rain cover or protective camera bag to shield your camera from mist, rain, or splashes. These covers are designed to keep your camera dry while allowing you to access controls and view the LCD screen.
Carry a microfiber cloth or lens wipes to clean your lens and filters if they become moist or covered in water droplets. Maintaining a clear and dry lens is crucial for capturing sharp and clear images.
Be mindful of changing lenses in the field, as this can expose your camera’s sensor to dust and moisture. If you need to switch lenses, do so in a sheltered area and take precautions to prevent debris from entering the camera body.
Re-Visit in Different Seasons
Waterfall landscape photography undergoes remarkable transformations throughout the seasons. While it’s tempting to capture waterfalls during the lushness of spring or the vibrant colors of fall, don’t hesitate to revisit the same location in different seasons.
Winter, for instance, offers a unique opportunity to photograph frozen waterfalls and icicles. The icy textures and delicate patterns created by frozen water can be a captivating subject for your images.
In spring, you can capture the waterfall surrounded by blooming wildflowers or lush green foliage. The increased flow of water from melting snow can create more dramatic cascades.
Each season presents its own set of challenges and creative possibilities. By returning to the same waterfall at different times of the year, you can build a diverse portfolio of images that showcase the ever-changing beauty of nature.
Section 7: Safety and Environmental Ethics in Waterfall Photography
As passionate photographers, it’s our privilege to explore and capture the mesmerizing beauty of waterfalls. However, it’s equally important to approach this pursuit with a sense of responsibility, safety, and environmental consciousness. In this section, we will delve into essential considerations that go beyond photography techniques, ensuring that your waterfall photography excursions are safe, respectful of nature, and sustainable.
Safety Advice
- Scout and Plan: Before you embark on a waterfall photography trip, thoroughly research the location. Know the trails, terrain, and potential hazards. Always inform someone about your itinerary and expected return time.
- Stay on Designated Paths: Many waterfall locations have designated paths and viewing areas. Respect these boundaries to protect fragile ecosystems and prevent accidents.
- Wear Appropriate Footwear: Sturdy hiking boots with good traction are essential for navigating uneven and slippery terrain. Falls can happen when you least expect them.
- Beware of Slippery Surfaces: Rocks near waterfalls are often slick. Exercise caution when stepping on wet surfaces, and use handrails if available.
- Mind Your Step: Be aware of your surroundings and watch your step. Keep a safe distance from the edge of cliffs or steep slopes.
- Weather Awareness: Be prepared for changing weather conditions. Dress appropriately, and carry rain gear in case of unexpected showers.
- Respect Local Regulations: Abide by any rules or regulations set by park authorities or landowners. These guidelines are in place to protect both visitors and the environment.
Environmental Ethics
- Leave No Trace: Adhere to the Leave No Trace principles, which advocate for minimizing your impact on natural areas. Carry out all trash, avoid disturbing wildlife, and leave flora and fauna undisturbed.
- Avoid Trampling Vegetation: Stay on established trails and paths to prevent damaging delicate plants and soil. Avoid creating new paths or disturbing vegetation to get a shot.
- Respect Wildlife: Observe wildlife from a distance and avoid actions that could stress or harm animals. Keep a safe distance, use telephoto lenses for wildlife photography, and refrain from feeding wildlife.
- Be Mindful of Water Quality: Water quality is crucial for the health of aquatic ecosystems. Avoid using soaps, lotions, or chemicals near water bodies, as these can harm aquatic life.
- Minimize Light Pollution: If photographing waterfalls at night, use minimal artificial lighting to reduce light pollution that can disrupt the nocturnal environment.
- Ethical Drone Use: If using drones for aerial photography, adhere to local regulations and respect privacy. Avoid flying drones in sensitive natural areas, as they can disturb wildlife and other visitors.
Leave Room for Others
Waterfall photography locations can get crowded, especially during peak seasons. Be courteous to fellow photographers and nature enthusiasts. Allow others to enjoy the view and access prime shooting locations. Respect their space and right to capture their own images.
Section 8: The Photographic Journey Continues
As we draw to a close on this comprehensive guide to waterfall photography, it’s essential to remember that your journey as a photographer is a continuous exploration of artistry and self-expression. In this final section, we’ll reflect on the broader aspects of your photographic journey and offer some parting thoughts and inspiration.
Constant Learning and Growth
Photography is an ever-evolving craft. Regardless of your skill level or years of experience, there is always something new to learn, techniques to master, and creative boundaries to push. Embrace this journey of constant learning and growth as an integral part of your passion for photography.
Attend workshops, explore different genres, experiment with diverse equipment, and challenge your creative boundaries. Every photograph you capture, whether successful or not, contributes to your growth as a photographer. Embrace your mistakes as valuable lessons, and let your successes fuel your confidence and enthusiasm.
Finding Your Unique Voice
Photography is not just about capturing what you see; it’s about expressing how you see it. Your unique perspective, experiences, and emotions shape your photographic voice. Embrace your individuality as a photographer and let it shine through your work.
Take time to reflect on what inspires you, what stories you want to tell, and the emotions you want to convey through your images. Whether it’s the serenity of waterfalls, the grandeur of landscapes, or the intimacy of portraiture, your photography should reflect your personal vision and connection to the world.
Community and Collaboration
Photography is a solitary pursuit at times, but it’s also a gateway to a vibrant community of fellow photographers, artists, and enthusiasts. Engage with this community, both online and offline. Share your work, seek feedback, and collaborate with others who share your passion.
Photography can be a powerful tool for connecting with people and building bridges across cultures and languages. It’s a universal language that transcends borders and brings diverse voices together. Use your photography to tell stories, raise awareness, and foster understanding.
Never Lose Your Wonder
Amidst the technical aspects, creative challenges, and practical considerations of photography, never lose your sense of wonder. Approach each photography expedition, whether it’s to capture waterfalls, landscapes, or people, with the curiosity and awe of a child exploring the world for the first time.
The beauty of photography lies in its ability to freeze moments in time, to capture fleeting emotions, and to reveal the hidden details of the world around us. Embrace the magic of photography, and let it remind you of the extraordinary in the ordinary, the beauty in the mundane, and the wonder in the everyday.
Section 9: Additional Resources for Waterfall Photography
In your quest to become a skilled waterfall photographer, you’ll find that learning is a never-ending process. To aid you on your photographic journey, we’ve compiled a list of additional resources that can expand your knowledge, inspire your creativity, and connect you with a community of like-minded photographers.
1. Photography Workshops and Tours
Participating in photography workshops and tours is an excellent way to gain hands-on experience, learn from seasoned photographers, and explore stunning waterfall destinations. Look for workshops hosted by experienced professionals who specialize in landscape and nature photography. These workshops often provide valuable insights into composition, lighting, and post-processing techniques specific to waterfall photography.
2. Online Photography Communities
Joining online photography communities and forums allows you to connect with fellow photographers, seek feedback on your work, and learn from others’ experiences. Websites like Flickr, 500px, and photography-specific subreddits are great places to share your images, ask questions, and engage with a global photography community.
3. Photography Books
Numerous books are dedicated to the art and techniques of landscape and waterfall photography. These books cover a wide range of topics, from mastering camera settings to understanding composition and post-processing.
4. Online Photography Courses
Many online platforms offer photography courses that cater to various skill levels and interests. Websites like Udemy, Coursera, and Skillshare host courses on landscape and nature photography, providing structured learning modules, video tutorials, and assignments to enhance your skills.
5. Photography Magazines and Blogs
Stay updated with the latest trends, techniques, and inspiration by subscribing to photography magazines or following photography blogs. Magazines like “Outdoor Photographer” and “Digital Photography School” offer valuable insights, while blogs written by experienced photographers provide personal anecdotes and expert advice.
6. Photography Equipment Reviews
When it comes to choosing the right gear for waterfall photography, reliable reviews can be invaluable. Websites like DPReview and Imaging Resource offer in-depth reviews of cameras, lenses, and accessories, helping you make informed decisions about your equipment.
7. Editing Software Tutorials
Mastering post-processing is a crucial aspect of waterfall photography. Online tutorials for software like Adobe Lightroom and Photoshop can help you enhance your images, from adjusting exposure to fine-tuning colors and textures. Websites like Adobe’s official tutorials, Fstoppers, and Phlearn offer comprehensive guides.
8. Local Photography Clubs and Meetups
Consider joining local photography clubs or attending photography meetups in your area. These gatherings provide opportunities to connect with fellow photographers, share experiences, and explore new shooting locations together. Building a local network can also lead to exciting collaborations and shared adventures.
9. Conservation Organizations
As a waterfall photographer, you’ll likely spend a significant amount of time in natural settings. Consider getting involved with conservation organizations that protect and preserve these landscapes. Contributing to conservation efforts not only helps preserve the beauty you capture but also gives back to the environment.
10. Continued Practice and Exploration
Ultimately, the most effective way to improve your waterfall photography skills is through continuous practice and exploration. Keep your camera handy, embrace challenges, and allow your creativity to flow. Visit different waterfalls, seek unique perspectives, and never stop discovering the wonders of nature through your lens.
Your photographic journey is a personal and ever-evolving one, and these resources are here to guide and inspire you along the way. Remember that each photograph you take is a reflection of your unique perspective and passion for capturing the beauty of waterfalls and the natural world. Enjoy the process, and may your waterfall photography adventures be filled with stunning images and enriching experiences.