A Beginner’s Guide to Post Processing in Landscape Photography: 26 Tips
This article will provide you with a comprehensive beginner’s guide to post processing in landscape photography. Discover the importance of post processing and how it can enhance your landscape photos. Learn the ins and outs of using popular tools like Lightroom and Photoshop for post processing. Explore essential techniques such as adjusting exposure, blending multiple exposures, and focus stacking. Dive into advanced Photoshop techniques including the use of masks, advanced blending, and professional color grading. Finally, discover how to streamline your post-processing workflow for maximum efficiency.
What is Post Processing in Landscape Photography?
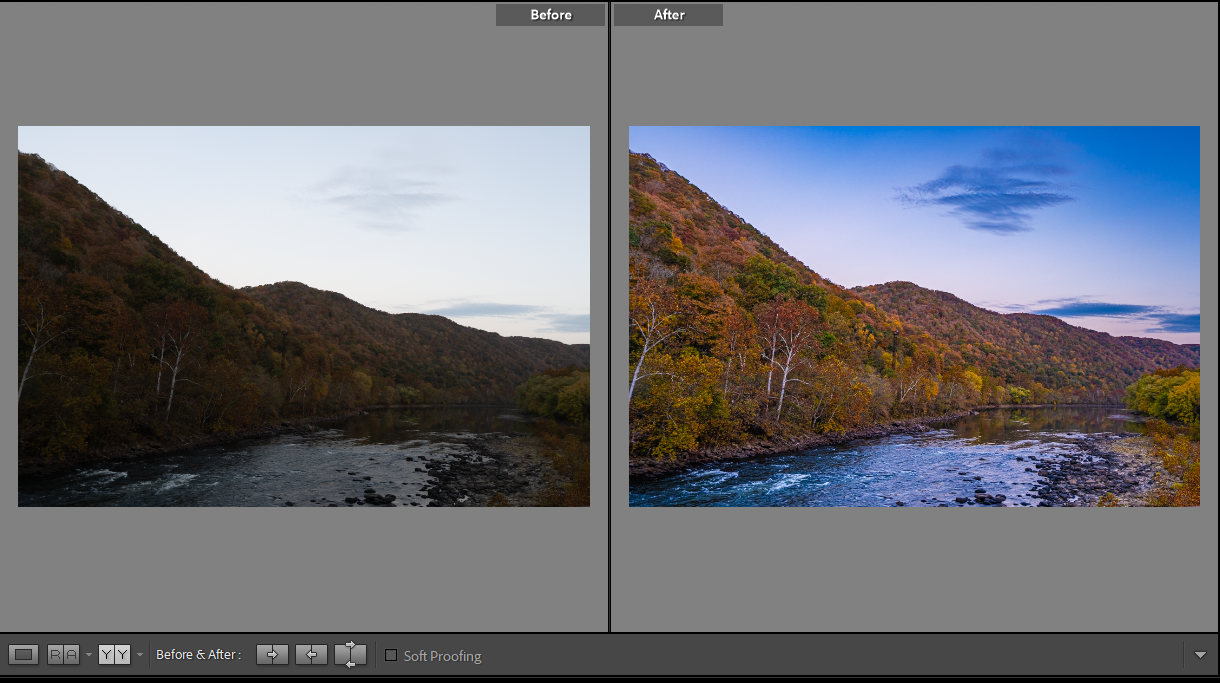
Post processing in landscape photography is the process of editing and enhancing the captured images using software like Lightroom and Photoshop. It allows photographers to fine-tune their images, correct exposure, adjust colors, and apply various creative effects to produce stunning landscape photos. Post processing enhances landscape photos by enabling photographers to make adjustments that can improve the overall look and feel of the image. It allows for adjustments to exposure, color balance, sharpness, and other aspects to create a visually appealing photograph.
The key tools used in post processing for landscape photography are Lightroom and Photoshop. Lightroom is a powerful photo editing software designed specifically for photographers. It provides a comprehensive set of tools for organizing, editing, and exporting images. Photoshop, on the other hand, offers more advanced editing features and is often used for more intricate image manipulation and creative effects.
Post processing is essential for landscape photographers as it gives them the opportunity to optimize their images and bring out the full potential of the scenery captured. It allows photographers to create a final image that matches their vision and showcases the beauty of nature.
Tip 1: Familiarize with Adobe Lightroom and Adobe Photoshop
Adobe Lightroom and Photoshop are potent tools in the arsenal of a photographer. As someone who has spent numerous hours tinkering with these applications, I can attest to their efficacy in transforming a good photo into a great one.
Adobe Lightroom: Lightroom is more than just a photo-editing software; it’s a comprehensive workflow tool. Here are some facets to explore:
- Library Module: Organize, tag, and rate your photos. It’s where I spend time culling my images, picking out the best ones for editing.
- Develop Module: This is the heart of Lightroom, offering a plethora of editing tools from basic exposure adjustments to advanced tone curve modifications.
- Export Settings: Understanding export settings is crucial for getting high-quality results, whether for web or print.
Adobe Photoshop: Photoshop is the go-to tool for in-depth photo manipulation and creative editing.
- Layers: Layers are fundamental in Photoshop. Each adjustment, filter, or effect can be applied to its layer, allowing non-destructive editing.
- Selection Tools: The magic wand, lasso, and marquee tools are powerful for making precise selections, a cornerstone of advanced editing.
- Clone Stamp and Healing Tools: These are your best friends for removing unwanted objects or blemishes.
Tip 2: Explore Noteworthy Features
Diving deeper into the notable features of these software can significantly elevate the quality of your edits.
- Presets and Actions: Lightroom’s presets and Photoshop’s actions have been a time-saver. They allow for applying a set of adjustments with just one click.
- Masking: Masking is a sophisticated feature that lets you apply adjustments selectively.
- Smart Objects: In Photoshop, converting layers to Smart Objects before applying filters preserves the original data, enabling non-destructive editing.
Tip 3: Discover Alternatives
While Adobe’s offerings are robust, exploring alternatives broadened my editing horizons.
- Capture One: Known for its color grading capabilities. It offers a different workflow and toolset that some photographers prefer.
- DxO PhotoLab: Its noise reduction and lens correction tools are top-notch.
- GIMP: A free alternative to Photoshop with a range of editing features.
Tip 4: Shoot in RAW
Shooting in RAW was a paradigm shift in my photography journey. RAW files retain all the image data captured by the sensor, providing a higher bit depth and more flexibility in post-processing.
- White Balance Adjustment: RAW allows for easy white balance adjustments without degradation in image quality.
- Exposure Corrections: Overexposed or underexposed areas can be corrected to a significant extent.
Tip 5: Understand Post-Editing
Post-editing is an art and science that enhances your photography manifold.
- Exposure Adjustment: Correcting exposure is often the first step. I use the histogram in Lightroom to ensure I have a well-balanced exposure.
- Color Correction: Ensuring accurate colors is fundamental. The HSL (Hue, Saturation, Lightness) panel in Lightroom is a powerful tool for this.
- Sharpening and Noise Reduction: Striking a balance between sharpness and noise is crucial for a clean, crisp image.
Tip 6: Start with Cropping
Cropping is the first step in my post-processing workflow and it’s more than just about fitting an image into a desired aspect ratio. It’s a powerful compositional tool that can dramatically affect the visual impact of your photos.
- Rule of Thirds: While cropping, I often employ the rule of thirds to enhance compositional balance. Aligning key elements along these lines or at their intersections can create a more pleasing composition.
- Eliminate Distractions: Cropping helps in removing unwanted elements that may distract the viewer’s attention from the main subject.
- Change Orientation: Sometimes flipping an image from landscape to portrait orientation or vice versa can offer a fresh perspective and better alignment.
- Maintain Aspect Ratio: While it’s tempting to crop freely, maintaining a consistent aspect ratio across images creates a more professional appearance.
Tip 7: Utilize Graduated Filters
Graduated filters are one of my favorite tools in Lightroom for landscape photography. They allow for a smooth transition between adjustments, perfect for balancing exposures between the sky and foreground.
- Balancing Exposures: By dragging a graduated filter down from the sky, I can reduce exposure in overly bright skies without affecting the foreground.
- Color Adjustments: Graduated filters are also useful for adding or reducing color casts, like adding a warm tint to a sunset sky.
- Clarity and Sharpness: I often use graduated filters to increase clarity or sharpness in specific areas without affecting the entire image.
Tip 8: Local Edits with Radial Filter
The Radial Filter in Lightroom is a boon for making local adjustments. It creates a circular or elliptical area where you can apply various adjustments.
- Spotlight Effect: By creating a radial filter and decreasing the exposure outside it, you can create a spotlight effect that draws attention to a specific area.
- Selective Color Enhancements: I love using radial filters to enhance the colors of a specific area like making a flower pop in a sea of green.
- Softening Backgrounds: Applying a slight negative clarity or sharpness inside a radial filter can help in softening backgrounds.
Tip 9: Apply Global Adjustments
Global adjustments are critical for setting the baseline look of your image.
- Exposure and Contrast: I start with adjusting the exposure and contrast to get the right brightness and dynamic range.
- Color Balance: Getting the right color balance is crucial. The temperature and tint sliders are your friends here.
- Saturation and Vibrance: While both affect color intensity, I find vibrance to be subtler as it preserves skin tones.
Tip 10: Add an Edge Vignette
Adding an edge vignette is a classic way to draw the viewer’s eye towards the center.
- Amount and Midpoint: I play with the amount and midpoint sliders to get the right intensity and spread of the vignette.
- Feathering: A higher feathering value creates a smoother transition between the vignette and the image, which I prefer for a more natural look.
- Highlights: The highlight slider in Lightroom helps in recovering highlights that might be lost due to the vignette, ensuring a balanced look.
Tip 11: Explore Dodge & Burn
Dodge and Burn are traditional darkroom techniques that have found their way into the digital realm. They allow for selective brightening (dodging) and darkening (burning) of areas in an image, which can enhance the three-dimensional look of photos.
- Creating Depth: By dodging the highlights and burning the shadows, you can create a greater sense of depth and dimension in your photos.
- Enhancing Features: In portrait photography, dodge and burn can be used to enhance facial features in a flattering way.
- Selective Contrast: You can add contrast to specific areas of an image, drawing attention to your subject.
Tip 12: Experiment with Orton Effect
The Orton Effect adds a dreamy, ethereal quality to images by blending a sharp photo with a blurred version. It’s a technique I’ve found particularly effective in landscape photography.
- Creating a Glow: The Orton Effect creates a soft glow which can add a magical feel to your landscapes.
- Enhancing Mood: This effect can enhance the mood of a photo, making it feel more romantic or surreal.
- Blending in Photoshop: Create two copies of your image layer. Apply Gaussian Blur to one, then blend using the Multiply mode. Adjust opacity to taste.
Tip 13: Establish a Post-Processing Workflow
Establishing a structured workflow is essential for efficient post-processing. It helps ensure that you don’t miss any crucial steps and allows for a more organized approach to editing.
- Import and Cull: Start by importing your photos into Lightroom or your chosen software, then cull the weak images.
- Basic Adjustments: Make global adjustments like exposure, white balance, and contrast.
- Detailed Editing: Move on to more detailed editing like dodging and burning, local adjustments, and retouching.
- Special Effects: Apply any desired effects like the Orton Effect, black and white conversion, etc.
- Export: Finally, export your images with the correct settings for your intended use.
Tip 14: Focus Blending
Focus blending, also known as focus stacking, is a technique used to extend the depth of field in photos, especially useful in macro and landscape photography.
- Capture Multiple Shots: Start by capturing multiple shots with varying focus points from the foreground to the background.
- Align and Blend in Photoshop: Import your images into Photoshop, auto-align them, then auto-blend layers to merge the in-focus areas.
- Manual Adjustments: Sometimes, manual adjustments may be needed to ensure a perfect blend.
Tip 15: Manual Exposure Blending
Manual exposure blending is a technique used to merge different exposures of the same scene to create a well-exposed image. It’s incredibly useful in high-contrast scenes like sunrises or sunsets.
- Capture Bracketed Shots: Start by capturing a series of bracketed shots to cover the entire dynamic range of the scene.
- Layer and Mask in Photoshop: Import your shots into Photoshop, stack them as layers, and use layer masks to reveal or hide parts of each layer to achieve a well-exposed image.
- Fine-Tune: After blending, fine-tune your image by adjusting colors, contrast, and other parameters to achieve the desired look.
Tip 16: Combine Polarized and Un-Polarized Images
Combining polarized and un-polarized images is a technique I use to control reflections and enhance the colors in my photographs, especially in landscape and automotive photography.
- Capture Both Images: Shoot two images, one with a polarizing filter to cut reflections and enhance colors, and another without the polarizer to retain natural reflections.
- Blend in Photoshop: Import both images into Photoshop, align them as layers, and use layer masks to blend the polarized and un-polarized areas selectively.
Tip 17: Creative Temporal Exposure
Temporal exposure, involving varying the exposure during a single long exposure shot, can create unique and creative effects in landscape photography.
- Setup: Set your camera on a tripod, choose a long exposure time, and start with a small aperture.
- Change Settings: During the exposure, change the aperture to let in more light, creating a bright streak in the image.
- Experiment: This technique requires experimentation with different settings and timings to achieve the desired effect.
Tip 18: Create Star Trails in Photoshop
Creating star trails involves stacking multiple long-exposure shots to show the movement of stars in the night sky.
- Capture Multiple Long Exposures: Shoot a series of long-exposure shots to capture the stars’ movement.
- Stack in Photoshop: Import the images into Photoshop, align them, and use the Lighten blending mode to create the star trails.
- Enhance: Enhance the star trails by adjusting contrast, clarity, and color to make the trails more prominent.
Tip 19: Explore Color Grading
Color grading is a crucial step in post-processing to set the mood and tone of your images.
- Adjust Color Balance: Start with adjusting the color balance to achieve a neutral or desired color tone.
- Use Color Wheels: Color wheels in Photoshop or Lightroom allow for precise control over shadows, midtones, and highlights.
- Apply LUTs: Look-Up Tables (LUTs) are a quick way to apply a specific color grade, and there are many free and paid LUTs available online.
Tip 20: Understand Layers in Photoshop
Understanding layers is fundamental to harnessing the power of Photoshop.
- Organize Your Edits: Layers allow for non-destructive editing and organization. Each adjustment or effect can be on a separate layer.
- Use Layer Masks: Layer masks are essential for selectively applying adjustments or blending images.
- Group and Label: Grouping related layers and labeling them helps keep your project organized, making it easier to go back and make adjustments later.
Tip 21: Balance Light in Photoshop
Balancing light is an essential step in achieving a well-exposed and aesthetically pleasing image, especially in nature photography.
- Use Adjustment Layers: Utilize adjustment layers like Levels or Curves to control the brightness and contrast.
- Apply Gradient Maps: Gradient maps can help in balancing light and adding a creative touch to the lighting.
- Use Dodge and Burn: Dodge and Burn tools are excellent for fine-tuning the lighting in specific areas of your image.
Tip 22: Explore Creative Effects
Creative effects can add a unique flair to your images, making them stand out.
- Apply Filters: Filters in Photoshop offer a plethora of creative effects like blur, sharpen, distort, etc.
- Use Blend Modes: Experiment with different blend modes to achieve various effects.
- Add Textures: Textures can add depth and interest to your images. Blend a texture layer with your image using different blend modes and opacities.
Tip 23: Non-Destructive Editing with Plugins
Plugins can significantly enhance Photoshop’s functionality, allowing for a more streamlined and non-destructive workflow.
- Explore Plugins: Look into plugins like Nik Collection or Portraiture for advanced editing options.
- Use Smart Filters: Apply filters as Smart Filters to maintain the ability to adjust or remove the filter later.
- Employ Adjustment Layers: Use adjustment layers instead of direct adjustments to keep the original image intact.
Tip 24: Replace Sky and Focus Stack
Sky replacement and focus stacking are advanced techniques that can drastically improve the overall appeal of a photograph.
- Sky Replacement: Use the Sky Replacement tool in Photoshop to replace a bland sky with a more dramatic one.
- Focus Stacking: Merge multiple images taken with different focus points to achieve a greater depth of field.
Tip 25: Experiment with Different Shooting Techniques
Experimentation with different shooting techniques can open up new creative avenues.
- Long Exposures: Use a tripod and slow shutter speed to capture motion blur in water or clouds.
- Use Polarizers: Polarizing filters can enhance the sky, cut through reflections, and improve color saturation.
- City Lights: Experiment with different times of day and lighting conditions to capture stunning cityscapes.
Tip 26: Continuous Learning
Photography is a constantly evolving field with new techniques, tools, and technologies emerging regularly.
- Follow Photography Blogs: Stay updated with the latest techniques and gear by following photography blogs and forums.
- Join Photography Communities: Engage with other photographers, join photo walks, and participate in discussions to learn from others’ experiences.
- Attend Workshops: Workshops provide hands-on learning experiences under the guidance of experienced photographers.
The journey through Adobe Lightroom, Photoshop, and various post-processing techniques significantly refines photography skills, offering a rhythm in editing akin to brushstrokes on a canvas. These steps provide a deeper understanding and a structured workflow, enhancing the ability to transform ordinary images into extraordinary visuals. The continuous exploration and learning in photography open boundless creative avenues, with each tip acting as a stepping stone toward mastering this art and developing a unique style.